How to Identify and Help Remove an Ice Dam
Sometimes, even your best efforts to prevent an ice dam may not be enough. Knowing what an ice dam is, how to identify one and how to help remove it is important to protecting your roof and home from potential damage during the snowy, winter months.
What Is an Ice Dam?
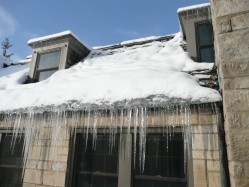
Ice dams may form when water from melting snow freezes into ice at the edge of your roofline. Without proper roof snow removal, the ice that develops may grow large enough to prevent water from melting snow from properly draining off the roof. When the water is unable to drain from the roof, it may then back up underneath roof shingles and make its way into your home.
Do You Have an Ice Dam?
Most ice dams develop on the edge of your roof, but they may also form in other locations, depending on the slope, orientation and style of your roof. Be sure to monitor the weather and your roof for signs of ice dam formations.
- Look closely at the icicles around the exterior of your house. If the icicles are confined to the gutters and there is no water trapped behind them, then an ice dam has likely not formed. Nonetheless, icicles can be a precursor to ice dams. Depending on their location and size, icicles may also pose a danger if they fall off. Whenever possible, and if safe to do so, remove icicles from the exterior of your home, making sure not to stand directly beneath them. If you cannot safely reach the icicles from the ground, consider hiring a contractor to assist in their removal.
- Check for water stains or moisture in your attic or along the ceiling of exterior walls of your house. Water stains or moisture may be an indication that an ice dam has formed and water has penetrated the roof membrane.
How to Remove an Ice Dam
Removing an ice dam from your roof immediately after spotting the signs can be critical to helping prevent damage to your home. One way to remove an ice dam is to melt it using calcium chloride ice melt.
Step 1. Using a roof rake, remove snow 3-4 feet from the edge of your roof, being careful not to damage the roof covering or to allow snow to build up around walking paths or to block emergency exits.
Step 2. Use a calcium chloride ice melt product, which you can generally purchase from your local hardware store. Be sure not to use rock salt or sodium chloride, which can damage your roof.
Step 3. Fill a nylon stocking with the calcium chloride ice melt.
Step 4. Safely place and position the calcium chloride-filled nylon stocking vertically across the ice dam so that it can melt a channel through the ice.
Step 5. Cover and protect any shrubbery and plants with lightweight tarps near the gutters or downspouts for the duration that the calcium chloride stockings remain in place. This is important because the calcium chloride-saturated water dripping from the roof may damage the shrubbery and plants.
REMEMBER: Using a ladder in snowy and icy conditions may be dangerous. If you cannot safely reach the roof, consider hiring a contractor.
Recent Posts
How to Identify and Help Remove an Ice Dam
Sometimes, even your best efforts to prevent an...How to Help Prepare Your Boat for Spring
Are you one of the millions of boaters with spr...Space Heater Safety Tips
In order to save money in the colder months, ma...Umbrella Insurance Coverage
Umbrella insurance provides extra liability cov...5 Tips to Protect Your Possessions with Valuable Items Insurance Coverage
You may think that a homeowners insurance polic...

